

Embrace the festive spirit with our enchanting DIY origami Christmas trees! This delightful and creative craft offers a charming way to infuse your home with holiday cheer, transforming simple paper into elegant festive decorations. Whether adorning your mantelpiece, enhancing your holiday table, or serving as unique gift toppers, these paper trees are sure to captivate. Our comprehensive guide, complete with clear photos and an insightful video tutorial, will walk you through every step, ensuring a fun and rewarding crafting experience. Get ready to fold your way to a beautifully decorated holiday season!

Why Origami Christmas Trees Are a Must-Have for Your Holiday Decor
Every year, as the holiday season approaches, we seek decorations that are both beautiful and meaningful. Origami Christmas trees effortlessly fulfill both desires. They are not just visually appealing; they embody the joy of handmade crafts, adding a personal touch that store-bought ornaments often lack. Beyond their aesthetic appeal, these paper trees are incredibly versatile. They can be created in various sizes and colors to complement any decor theme, from minimalist modern to rustic traditional. Furthermore, this craft is wonderfully eco-friendly, utilizing readily available paper, and budget-friendly, making elegant holiday decor accessible to everyone.
Imagine a cluster of these charming paper Christmas trees creating a serene snowy landscape on a shelf, or strung together to form a whimsical garland, bringing a touch of nature-inspired beauty indoors. They even make delightful embellishments for holiday gifts, offering an extra layer of thoughtfulness to your presents. This simple yet sophisticated project is a perfect addition to your annual Christmas decoration repertoire, promising to become a cherished part of your family’s festive traditions. It’s a wonderful way to engage children in holiday preparations, teaching them about creativity and the satisfaction of making something beautiful with their own hands. These DIY trees truly stand out as a unique and heartfelt expression of seasonal cheer.
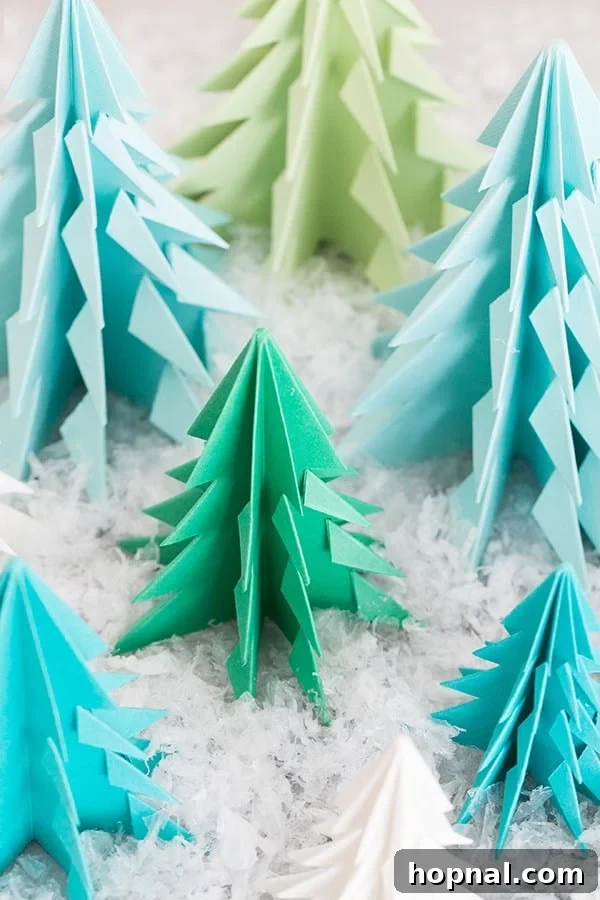
How To Make DIY Origami Christmas Trees: A Step-by-Step Guide
Materials for Your Origami Christmas Tree
Embarking on your origami journey requires only a few basic supplies, making this a wonderfully accessible craft for all ages and skill levels. Here’s what you’ll need to create your stunning paper Christmas trees:
- Letter-sized paper in shades of green, blue, and white. Experiment with various colors like festive reds, golds, or patterned papers to match your holiday theme. For larger, more impactful trees, consider acquiring larger square sheets of origami paper or sturdy craft paper.
- Scissors: A sharp pair of scissors is essential for clean, precise cuts, ensuring your trees have crisp edges and a professional finish.
Tip: You can buy large square sheets of paper from art supply stores to create bigger, more dramatic trees. The weight of the paper can also affect the final look; lighter paper is easier to fold, while slightly heavier cardstock offers more rigidity.

Step-by-Step Instructions for Folding Origami Trees
Creating these captivating origami Christmas trees is a rewarding experience, and our detailed instructions will guide you through each fold and cut. Follow these steps carefully to bring your paper trees to life:
- **Prepare Your Square:** Begin with a rectangular piece of paper. Take the top corner (e.g., top right) and fold it down diagonally so that the top edge aligns perfectly with the opposing side edge of the paper (e.g., the left side). This will form a large triangle at the top of your paper.
- **Form the Base Square:** Carefully cut off the rectangular strip of paper remaining at the bottom. You should now be left with a perfect square piece of paper that is already folded diagonally into a large triangle.
- **Refine the Triangle:** Take your large folded triangle and fold it in half once more, creating an even smaller triangle. Crease sharply to ensure a defined fold.
- **Unfold to Create Squares:** Gently open the smaller triangle. Then, open out the larger triangle you had in step 2. By pushing the center point inwards and flattening the paper, you can effectively fold it to create two distinct squares stacked on top of each other. This often involves forming new creases from the center outwards.
- **Create Tall Triangle Shapes:** With the squares stacked, take one of the open corners of the top square (a ‘flap’). Fold this flap towards the center line, aligning its edge with the central crease. Then, open it up and press down on the crease you just made to create a tall, pointed triangle. Repeat this process for all four ‘flaps’ on the stacked squares, effectively transforming your shape into four tall, slender triangles radiating from the center point. This is a crucial step in forming the tree’s distinctive layers.
- **Trim the Base:** At the bottom of your tall, multi-layered triangle shape, you’ll notice a small, triangular flap of excess paper. Using your scissors, carefully trim this bottom triangle off. This action creates a flat base for your tree and removes any unnecessary paper, ensuring a clean and stable finish.
- **Cut the Tree Layers:** On each of the four main ‘faces’ of your tree, you will now make horizontal cuts to form the branches. Starting from the bottom, make three evenly spaced horizontal cuts, going about two-thirds of the way towards the central fold. Ensure these cuts are symmetrical on all sides. For larger trees or to achieve a fuller look, you can make four or more rows of cuts to create additional tiers, giving your tree more height and volume.
- **Fold Down the Flaps:** Beginning with the lowest cuts, carefully fold down each of the cut flaps on every side. This folding action creates the layered, three-dimensional effect of a traditional Christmas tree. Work your way up, ensuring your folds are neat and symmetrical for the most appealing appearance. Gently adjust the layers to give your tree its final shape.
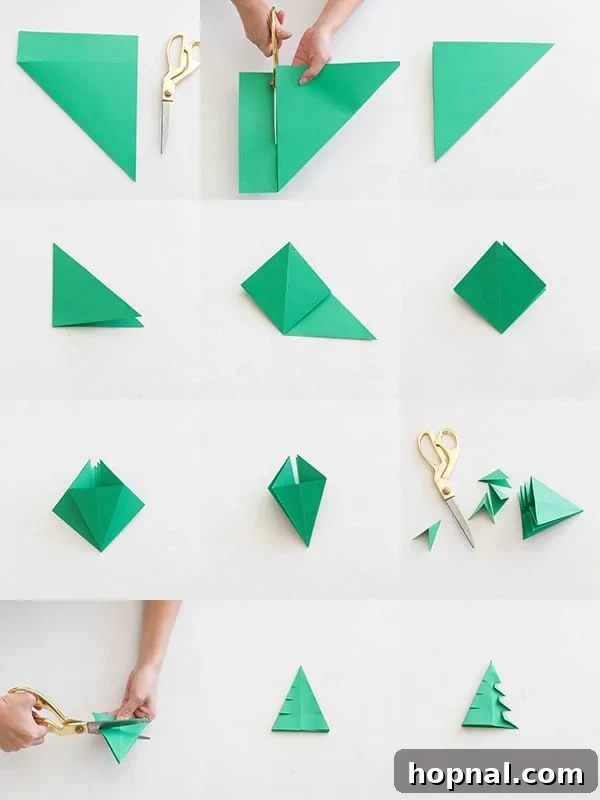
For a visual aid, here’s a helpful video demonstrating the origami Christmas tree folding process. Watching it can make the steps even clearer!
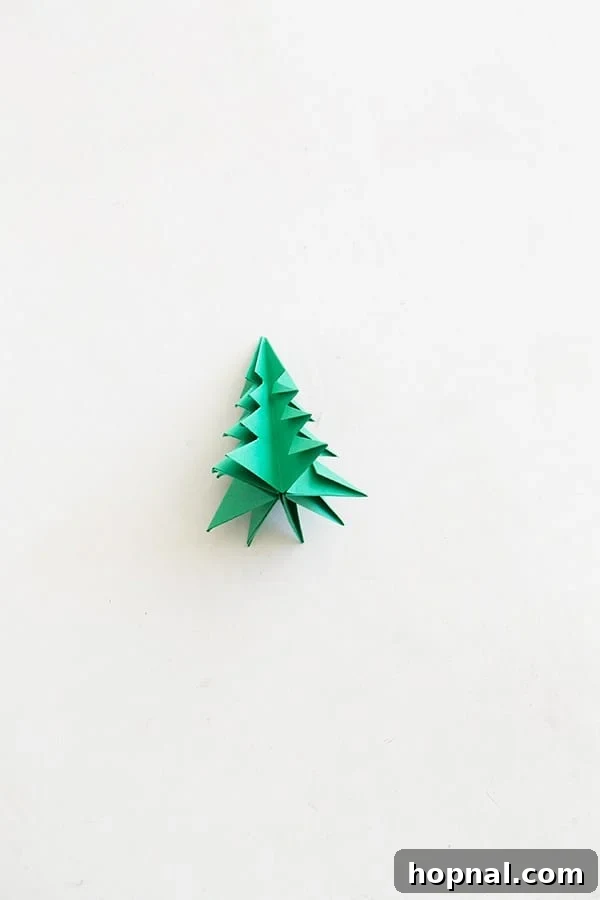
Remember, for larger paper sheets, you might want to increase the number of cuts to four or more rows on each side. This creates additional tiers, giving your majestic trees a grander, fuller silhouette, perfect for making a statement in your holiday arrangements.

Expert Tips for Perfect Origami Christmas Trees
Achieving beautiful origami trees is easier with a few insider tips that can elevate your crafting experience and the final product:
- **Precision is Key:** In origami, exact folds make all the difference. Take your time to align edges perfectly and crease firmly. A bone folder or the back of a spoon can help create super crisp lines.
- **Paper Choice Matters:** Lighter paper (like standard printer paper) is great for beginners, as it’s more forgiving and easier to manipulate. For a sturdier tree that holds its shape better, opt for slightly heavier craft paper or cardstock. If you’re using double-sided paper, consider how the colors or patterns will look when folded and revealed in the layers.
- **Embrace Imperfection:** If a fold isn’t absolutely perfect, don’t fret! Sometimes the charming irregularities add character and a unique handmade touch to your decor. Every tree will have its own personality.
- **Involve the Family:** This is a fantastic activity for kids, making it a memorable holiday bonding experience. They can help with folding, safe cutting (with supervision), or even decorating the finished trees. It’s a wonderful way to spend quality time together during the holidays and instill a love for DIY crafts.
- **Practice Makes Perfect:** Don’t be discouraged if your first tree isn’t exactly as you imagined. Origami is a skill that improves with practice. Start with simpler folds and gradually work your way up.
Creative Ways to Display Your Handmade Origami Christmas Trees
Once you’ve crafted your collection of charming paper Christmas trees, the possibilities for integrating them into your holiday decor are endless. Their simple elegance allows them to fit seamlessly into any festive setting, enhancing your home with a unique, handmade charm:
- **Enchanting Table Centerpieces:** Arrange a cluster of varying sizes and colors on your dining table, coffee table, or side tables. Add a sprinkle of fake snow, some tiny pinecones, or delicate fairy lights for a magical winter wonderland scene that will impress your guests. This creates a perfect ambiance for good times and great conversation at your Christmas table!
- **Whimsical Garlands:** String multiple trees together using twine, ribbon, or fishing line to create a charming garland. Drape it across your fireplace mantel, along a staircase banister, or elegantly frame a window for a whimsical touch.
- **Thoughtful Gift Toppers:** Attach a small origami tree to your wrapped presents for a unique and personalized touch. It makes your gifts stand out and adds an extra layer of heartfelt effort to your holiday offerings.
- **Shelf and Mantle Decor:** Line them up on shelves, windowsills, or your fireplace mantel to create a festive forest display. Group them with candles or other small holiday figurines for a cohesive look.
- **DIY Ornaments:** For smaller trees, punch a tiny hole at the top, thread a loop of string or ribbon through it, and hang them directly on your main Christmas tree for an artisanal and personal touch.
- **Window Displays:** Create a captivating scene by placing your origami trees on windowsills, perhaps backlit by fairy lights, to welcome guests and passersby with a warm, festive glow from outside.
- **Festive Wreaths:** Integrate them into a homemade wreath alongside fresh greenery, berries, or other natural elements for a truly unique door decoration. Pair them with this modern wreath garland for a contemporary look.
- **Place Card Holders:** For an elegant Christmas dinner party, use mini origami trees to hold guest name cards, adding a delightful and unexpected detail to each place setting.
Personalizing and Customizing Your Paper Creations
While elegant in their minimalist form, these DIY origami Christmas trees are also a blank canvas for your creativity. Don’t hesitate to add your unique flair and personalize them to match your holiday aesthetic:
- **Glitter and Sparkle:** For a dazzling effect that catches the light, apply glitter glue to the edges or tips of the folded flaps. You can choose fine glitter for a subtle shimmer or chunky glitter for a bolder statement.
- **Paint and Markers:** Use metallic markers (gold, silver, bronze) to draw intricate patterns, outlines, or simply add a touch of sparkle to the edges of the tree layers. A light dusting of spray paint in a complementary color (like metallic silver or gold) can also change their entire look and add a sophisticated sheen.
- **Small Adornments:** Glue tiny beads, sequins, mini pom-poms, or rhinestones onto the tree layers for added texture and sparkle. A small star sticker or a handcrafted paper star can serve as a perfect tree topper, completing the classic Christmas tree silhouette.
- **Varying Sizes and Colors:** The true beauty of this craft lies in creating a diverse collection. Experiment with different paper sizes to produce trees of various heights, from miniature accents to impressive focal points. Mix and match colors to build a dynamic and eye-catching display. A monochromatic scheme (e.g., all white, silver, and pale blue) offers a sophisticated, modern winter wonderland look, while a medley of traditional reds, greens, and golds evokes classic Christmas cheer. Consider ombre effects by using papers of gradually changing hues.
- **Patterned Papers:** Don’t limit yourself to solid colors! Utilize patterned scrapbook paper, festive wrapping paper, or even old sheet music for a vintage feel. The patterns will reveal themselves beautifully as the tree unfolds, adding an extra dimension of visual interest.
Crafting Joy with the Whole Family This Holiday Season
The holiday season is synonymous with togetherness, and what better way to bond than through a fun, creative project? These origami Christmas trees are perfect for family crafting sessions. Kids, with a little guidance, will delight in the process of transforming a flat sheet of paper into a three-dimensional tree. It’s an excellent way to develop fine motor skills, patience, and spatial reasoning, all while fostering a love for handmade decorations and the arts.
Imagine the laughter and shared memories as you gather around the kitchen table, perhaps with some hot cocoa and Christmas carols playing softly in the background. Each family member can contribute to a growing forest of paper trees, proudly displaying their unique creations. This activity is a fantastic tradition to start, creating not just beautiful decorations, but also cherished family moments that will be looked back upon fondly for years to come. It’s a simple, joyful way to celebrate the spirit of the season and make lasting memories.
Ready to get crafty? These DIY origami Christmas trees are simple, charming, and will add festive fun to your decor this season. You can use this setting to wow your guests and provide the perfect ambiance for good times and great conversation!
Happy holidays!
More DIY Holiday Projects You’ll Love!
Looking for more creative inspiration to brighten your holidays? Explore these delightful DIY holiday projects that you’ll absolutely adore! From charming gift ideas to unique home accents, we have everything you need to make your season bright:
- A Charming Way to Give a Gift!
- DIY Pipe Cleaner Snowflake Coasters
- Homemade Marbled Ornaments
- DIY Handwoven Willow Wreath
- DIY Floral Christmas Tree Ornaments
You can also FOLLOW US on FACEBOOK, INSTAGRAM, and PINTEREST to see more delicious recipes, cocktails, desserts, and parties!


DIY Origami Christmas Tree
This origami Christmas tree is a festive and creative Christmas craft that you can use to decorate for the holidays!
Course: DIY Crafts
Prep Time: 20 minutes
Total Time: 20 minutes
Servings: 1 Christmas tree per sheet
Author: Eden
Ingredients
- Scissors
- Letter-sized paper (green, blues, and white recommended)
Instructions
- Fold top corner of the paper to align with the opposing side of the paper.
- Cut the bottom of the paper off so that you are left with a square paper folded into a triangle.
- Fold that in half into a smaller triangle.
- Open the triangles and fold down to create a square x 2.
- Open the sides of the squares to create a tall triangle x 4.
- Trim off the bottom triangle.
- Cut 3 rows on each side, spaced evenly.
- Fold down the bottom three flaps.
Notes
Tip – you can buy large square sheets of paper to make bigger trees for a more dramatic display.
Tried this Recipe? Tag me Today! Mention @sugarandcharm or tag us #sugarandcharm!