
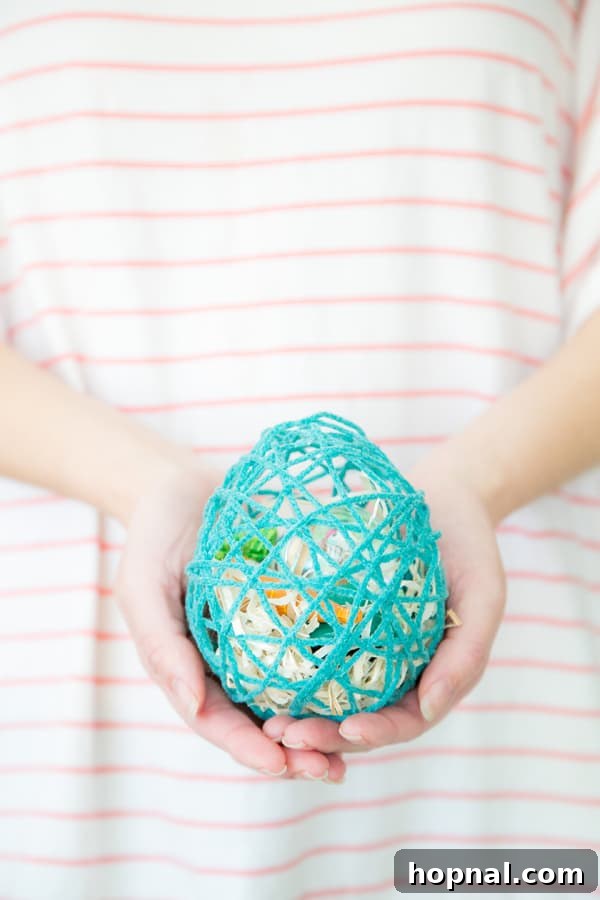
Craft Your Own Magic: DIY Easter Surprise Eggs with Yarn
Easter is a time for renewal, joy, and delightful surprises, and what better way to celebrate than by adding a personal touch to your festivities? These enchanting DIY Easter Surprise Eggs are a perfect craft project to infuse your home with the spirit of spring. Imagine delicate, handmade yarn eggs, each holding a secret treasure, ready to bring a smile to anyone who discovers its contents. This project is not only incredibly fun and engaging to make but also results in stunning decorations and thoughtful gifts that embody the magic of the season.
Using just a few simple materials – balloons, a basic glue mixture, and colorful yarn – you can transform everyday items into charming, egg-shaped wonders. The process is a delightful blend of creativity and a little bit of playful mess, making it an ideal activity for crafters of all ages. Whether you’re planning an elaborate Easter brunch, a cozy family dinner, or simply looking for a unique way to present treats, these yarn surprise eggs offer versatility and an undeniable charm that store-bought items simply can’t match. Get ready to create memorable keepsakes that capture the essence of Easter.

Elevate Your Easter Celebrations with Handmade Charm
Beyond being a fun and engaging craft, these DIY Easter Surprise Eggs serve multiple purposes, making them a fantastic addition to any Easter celebration. Picture them adorning your Easter brunch or dinner table, nestled amongst spring flowers and other charming decor. Their delicate structure and customizable colors allow them to seamlessly integrate into any aesthetic, adding a bespoke elegance that will surely impress your guests. They can be arranged in decorative bowls, placed individually at each table setting as a unique party favor, or even hung from decorative branches for a whimsical display.
The true joy of these eggs, however, lies in the delightful surprises they hold. For the adults at your gathering, fill them with gourmet chocolates, small bottles of exquisite essential oils, a piece of delicate jewelry, or even tiny handwritten notes of appreciation that express your gratitude. For the younger ones, the possibilities are endless: think miniature toys, stickers, colorful candies like chocolate carrots, or whimsical bunny globes. These aren’t just eggs; they are miniature treasure chests, designed to be gently opened, revealing a personalized treat or message. They can even replace traditional plastic eggs in an Easter egg hunt, offering a more artisanal, personal, and environmentally conscious alternative. Each egg becomes a unique discovery, adding an element of interactive fun to your holiday.

Crafting Your Own Easter Surprise Eggs: A Step-by-Step Guide
Ready to embark on this creative adventure? Making these yarn Easter eggs is simpler than you might imagine, and the results are incredibly rewarding. Gather your materials, clear a workspace, and prepare for a wonderfully messy and fun crafting session. Remember, the beauty of DIY lies in the unique imperfections and personal touches you bring to each creation. The entire preparation and crafting process takes about 30 minutes, but you’ll need to allow a full day for drying.
What You’ll Need: Essential Supplies for 6 Surprise Eggs
Before you begin, ensure you have all the necessary supplies. Most of these items are readily available at craft stores, discount retailers, or even around your home. For this project, you’ll be able to create approximately six charming surprise eggs.
- Small Balloons: Approximately 6 balloons. These will serve as the mold for your eggs. Choose round or oval balloons (water balloons often work well) for the best egg shape.
- Elmer’s Glue (or similar craft glue): One bottle of non-toxic, water-soluble white craft glue. Elmer’s glue is ideal as it dries clear and stiff, providing the perfect structure for your yarn eggs.
- Yarn: Plenty of yarn in your favorite Easter colors! Think soft pastels, vibrant spring shades, or even multi-colored skeins for a variegated effect. The type of yarn (acrylic, cotton, wool blend) doesn’t matter as much as its consistency – avoid overly fluffy or very thin yarn for best results.
- Scissors: For cutting yarn into manageable lengths.
- Clothespins: Essential for hanging your wet yarn eggs to dry evenly.
- Small Bowl: For mixing your glue solution.
- Newspaper or Protective Covering: To cover your workspace, as this craft can get a bit messy!
- Easter Grass (optional): For cushioning treats inside the finished eggs, adding another layer of festive appeal.
- Assorted Treats and Surprises: Chocolates, small toys, tiny figurines, stickers, or personalized notes to fill your eggs.

Detailed Directions for Beautiful Yarn Eggs
-
Prepare Your Workspace and Glue Mixture
First, lay down plenty of newspaper, old towels, or a protective plastic sheet to cover your crafting area. This project can be delightfully messy, so protecting your surfaces is key! In a small bowl, create your glue mixture by combining equal parts Elmer’s glue and water. Stir thoroughly until you have a smooth, consistent liquid. This dilution helps the yarn absorb the glue evenly and makes it easier to work with, ensuring a strong final product.
-
Prepare the Yarn
Unroll your chosen yarn and cut it into several long, manageable strings. The exact length isn’t crucial, but aim for pieces that are long enough to wrap around your balloon multiple times without being too cumbersome – about 2-3 feet per string works well. Once cut, fully submerge the yarn strings into the glue mixture, ensuring they are completely saturated. Let them soak for a few minutes while you prepare your balloons, allowing the glue to penetrate the fibers thoroughly.
-
Inflate Your Balloons
Blow up your small balloons to the desired egg size. Remember, the smaller the balloon, the harder it will be to stuff treats inside later. Aim for a size larger than a child’s fist to allow for ample filling space and easy access. Tie off the balloons securely, creating a small knot at the end of the neck. For a more authentic egg shape, you can gently squeeze and mold the balloon as you inflate it, or opt for oval-shaped balloons if available.
-
Wrap the Yarn: The Artistic Stage
Now for the fun part! Take one piece of glue-soaked yarn out of the bowl. Gently run your fingers along the length of the yarn to remove any excess glue. You want the yarn to be thoroughly coated but not dripping excessively. Begin wrapping the yarn around the inflated balloon. Start from the top, working your way down, then side to side, creating a crisscross pattern. Ensure the yarn covers the entire surface of the balloon to form a strong, cohesive egg shape. Experiment with different densities of wrapping – a tighter wrap will create a more solid egg, while a looser wrap will yield a more delicate, lacy appearance. Continue until you’re happy with the coverage and shape.
-
Create an Opening for Surprises
As you near the end of your wrapping, consciously leave a slightly larger, less densely covered gap at the very bottom of the balloon. This opening will be crucial for stuffing your Easter treats into the dried egg later. Don’t make it too big initially, but ensure it’s large enough to work with. The yarn’s inherent flexibility after drying will allow you to gently manipulate and stretch this opening when it’s time to add your surprises.
-
Drying Time: Patience is Key
Once you are satisfied with the yarn coverage and egg shape, use clothespins to hang the wet balloons in a well-ventilated area. A laundry room, a drying rack, or even an outdoor clothesline on a dry, non-humid day works well. Place newspaper or plastic sheeting underneath to catch any residual drips. Allow the yarn-wrapped balloons to dry completely overnight, or for at least 12-24 hours, until the yarn is firm and hard to the touch. Rushing this step can compromise the structural integrity of your eggs, leading to a flimsy result.
-
The Grand Reveal: Removing the Balloon
The next day, once your yarn eggs are perfectly dry and rigid, it’s time to remove the inner balloon. Carefully pop the balloon with a sharp pin or a small pair of scissors. As the balloon deflates and shrinks, it may stick slightly to the inside of the yarn structure. Don’t worry if the egg shape seems to distort momentarily; you can gently pull the balloon away from the yarn and ease it out through one of the openings. Once the balloon is completely removed, the yarn egg will spring back to its intended shape, showcasing your beautiful hollow creation.
-
Final Touches: Filling Your Surprise Eggs
With your beautiful yarn eggs ready, it’s time for the ultimate surprise! Gently stretch the opening you left at the bottom of each egg a little further. Carefully place a handful of soft Easter grass inside to create a nest for your treats, preventing them from falling out or being damaged. Then, add your chosen candies, small toys, or messages. Once filled, gently pull the yarn back together to mostly close the opening. The flexibility of the yarn allows it to hold its shape while still being easy for your guests to pull apart and discover the hidden treasures. These eggs are designed for a gentle unwrapping, adding to the anticipation and fun.

Tips for Crafting Success and Creative Variations
- Don’t Skimp on Glue: Ensure your yarn is thoroughly soaked. This is the critical step that gives the eggs their rigidity and helps them maintain their shape after the balloon is removed.
- Mind the Mess: This is a glue-heavy project. Protect your surfaces with newspaper or a plastic tablecloth, and have paper towels or wet wipes handy for clean-up.
- Vary Your Yarn: Experiment with different weights, colors, or textures of yarn for varied visual effects. Ombre or variegated yarns can create beautiful patterns effortlessly, while metallic threads can add a touch of sparkle.
- Embellish After Drying: Once completely dry, you can further decorate your yarn eggs. Add glitter, attach small beads or sequins, glue on artificial flowers, or even use a light spray of pastel paint for an extra festive touch.
- Supervise Children: While this is a fun family activity, ensure children are supervised when handling scissors and balloons to prevent accidents.
- Practice Makes Perfect: Don’t be discouraged if your first egg isn’t flawless. Each one will be unique and charming in its own way! The process is part of the fun.
Your guests will absolutely love the interactive element of these eggs! Imagine their delight as they gently pull apart the delicate yarn strands to reveal the sweet or playful surprise hidden within. These handmade creations are more than just a craft; they’re an experience, a memory in the making, and a testament to the warmth and care you put into your Easter celebration. They provide a unique way to present gifts, making each recipient feel extra special.

More Charming Easter Ideas to Inspire Your Creativity
Looking for more ways to make your Easter celebration unforgettable and brimming with handmade joy? Here are some other delightful ideas that perfectly complement your DIY Easter Surprise Eggs:
- DIY Old Fashioned Easter Candy Box: Craft a nostalgic container to present your Easter sweets with vintage charm.
- Wood Burning Easter Eggs: For a rustic and artistic touch, explore the craft of wood burning on eggs for unique designs.
- Pin the Tail on the Easter Bunny Printable: A classic game perfect for family fun and entertaining children during your Easter gathering.
- Bunny Sugar Cookies: Bake and decorate adorable bunny-shaped sugar cookies, a sweet treat for all ages.
- Easter Egg Decorating Party: Gather friends and family for a creative afternoon of decorating traditional Easter eggs.
- Carrot Mimosa: A refreshing and unique beverage for your Easter brunch, adding a festive twist to a classic drink.
We absolutely love seeing your handmade creations! If you decide to make these delightful DIY Easter Surprise Eggs, please share your experience and creative twists. Leave a comment below with your tips, tricks, or favorite fillings, and don’t forget to tag us on social media! Mention @sugarandcharm or use the hashtag #sugarandcharm so we can admire your beautiful work. Happy crafting and Happy Easter!
This post contains Amazon Affiliate links. As an Amazon Associate, we earn from qualifying purchases.