

Elegant Calligraphy Easter Eggs: The Perfect DIY for Your Easter Brunch
Welcome to a delightful and incredibly easy entertaining idea that will transform your Easter celebration! This guide will walk you through the process of creating charming calligraphy Easter egg designs, perfect for use as sophisticated “name cards” for your festive Easter brunch or simply as beautiful decorative accents around your home. Add a personal touch that speaks volumes about your attention to detail and creative spirit.
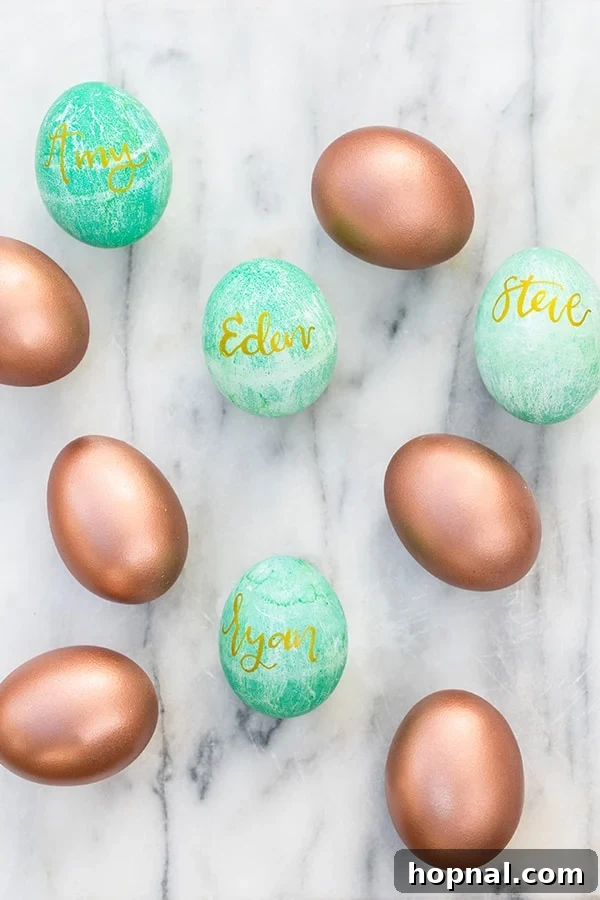
We absolutely adore how these personalized calligraphy eggs turned out. The combination of vibrant colors, metallic sheen, and delicate gold lettering created a truly captivating display. What’s even better is how surprisingly easy they are to make! We proudly featured them at our colorful Easter brunch, and they instantly infused the entire table with an unparalleled sense of charm and sophistication. Each guest was delighted to find their name beautifully scripted on an individual egg, making their experience feel exceptionally special and curated.
Why Calligraphy Easter Eggs Are a Must for Your Celebration
In the realm of Easter decor, personalized calligraphy eggs stand out as a unique and thoughtful addition. They offer more than just aesthetic appeal; they blend functionality with artistry. Imagine the delight on your guests’ faces as they discover a beautifully crafted egg bearing their name, serving as an elegant place setting. This small detail can significantly elevate your entire brunch experience, transforming a simple meal into a memorable event.
Beyond their role as name cards, these eggs contribute to a cohesive and stylish decor theme. They are incredibly versatile, capable of complementing a wide range of styles from rustic farmhouse to modern minimalist. Creating them yourself also offers a wonderful creative outlet, allowing you to customize colors, lettering styles, and overall presentation to perfectly match your vision. It’s a cost-effective way to achieve a luxurious, high-end look that store-bought decorations often lack, making your Easter celebration truly one-of-a-kind.
Essential Materials for Your DIY Calligraphy Easter Eggs
Gathering your materials beforehand ensures a smooth and enjoyable crafting experience. Most items are readily available at grocery stores, craft shops, or online retailers. Here’s what you’ll need to create your stunning calligraphy Easter eggs:
- Hard-Boiled Eggs: Start with at least a dozen, or more if you plan to make extras for general decoration. Ensure they are completely cooled and dry before you begin any decorating steps. This provides a clean, stable canvas.
- Egg Dyeing Kit: A standard kit offers vibrant colors and is easy to use. For a more natural approach or specific shades, food coloring mixed with white vinegar can be an excellent alternative.
- Metallic Spray Paint (Optional): For that truly luxurious touch, a can of copper, gold, or silver metallic spray paint will add a beautiful luster. Look for paints labeled as quick-drying and suitable for craft projects. Always use in a well-ventilated area.
- Gold Fine-Tip Permanent Marker: The metallic gold Sharpie is highly recommended for its ease of use, brilliant opaque finish, and quick-drying ink. For those with more experience in lettering, specialized gold calligraphy pens or brush markers can also be used.
- Protective Surface: Old newspapers, a plastic tablecloth, or a large cardboard box will protect your work area from dyes and paint.
- Drying Rack: An empty egg carton or a cooling rack placed over paper towels is perfect for allowing your eggs to dry evenly after dyeing and painting.
- Gloves: Disposable gloves are a must to protect your hands from staining with egg dye or paint.
- Small Container for Dye: Cups or bowls for mixing your egg dyes.
How to Make Charming Calligraphy Easter Egg Designs: A Step-by-Step Guide
Creating these exquisite personalized eggs is a rewarding process that combines a few simple steps. Follow this guide to achieve beautiful results that will impress your guests and add a unique touch to your Easter celebration.
Step 1: Prepare and Dye Your Easter Eggs with Vibrant Colors
- Perfectly Hard-Boil Your Eggs: The foundation of any great decorated egg is a perfectly cooked hard-boiled egg. Ensure your eggs are boiled and then cooled completely, ideally in an ice bath, to prevent cracking and make them easier to handle. Once cool, gently pat them dry with a clean paper towel to remove any moisture, which is crucial for dye adherence and future painting/writing.
- Select Your Color Palette: The beauty of DIY is customization! Choose egg dye colors that perfectly match or complement your Easter brunch theme. Soft pastels like mint green, sky blue, and blush pink create a traditional spring aesthetic, while bolder jewel tones can add a modern flair. Consider the colors of your table linens, floral arrangements, and other decor elements to create a harmonious look. For an in-depth exploration of various techniques and to ensure rich, even colors, be sure to consult our ultimate guide to dyeing Easter eggs. This resource covers everything from achieving vibrant hues to preventing common dyeing mishaps.
- The Dyeing Process: Following the instructions provided with your egg dye kit, prepare your dye solutions in individual cups or bowls. Submerge each egg into the dye bath, allowing it to soak for the recommended time or longer for a more intense color. Experiment with different immersion times to create a range of shades within your chosen palette.
- Thorough Drying is Key: Once dyed to your satisfaction, carefully remove the eggs using an egg dipper or slotted spoon. Place them on an egg carton or a wire rack lined with paper towels to dry completely. This step is vital; any residual moisture can lead to uneven application of metallic paint or cause your calligraphy ink to bleed.
Step 2: Add a Touch of Metallic Elegance (Optional for Copper/Gold Eggs)
- Preparation for Painting: If you’ve decided to incorporate metallic elements, ensure your dyed eggs are absolutely dry from the previous step. Move to a well-ventilated area, such as outdoors or an open garage, and lay down ample newspaper or a drop cloth to protect surfaces. Wearing gloves is highly recommended for this stage to keep your hands clean.
- The Art of Spray Painting: Hold the metallic spray paint can approximately 6 to 8 inches away from the egg. Apply the paint in light, even coats, rotating the egg gently as you spray. The key here is to apply multiple thin layers rather than a single heavy coat, which can cause drips and an uneven finish. For our demonstration, we used a stunning copper metallic paint, which provided a rich, warm base that beautifully contrasted with the gold calligraphy. This step elevates the eggs from simple dyed eggs to sophisticated decorative pieces.
- Patient Drying Time: After painting, carefully place the metallic eggs back onto your drying rack. Allow them to dry thoroughly according to the paint manufacturer’s instructions, which can range from 30 minutes to several hours, depending on the paint type and ambient humidity. Rushing this step can lead to smudged paint or an imperfect surface for your lettering.
Step 3: Personalize with Beautiful Calligraphy or Elegant Hand Lettering
- Choosing Your Lettering Tool: For brilliant results and ease of use, especially for beginners, a fine-tip metallic gold permanent marker (such as a gold Sharpie) is an excellent choice. Its opaque, quick-drying ink and precise tip make it ideal for delicate lettering on a curved surface. If you’re an experienced calligrapher, feel free to use a gold calligraphy pen or brush marker with metallic ink for a more traditional touch.
- Practice Makes Perfect: Before committing to your finished eggs, it’s highly advisable to practice writing names on a scrap piece of paper or even on a spare, undecorated egg. Experiment with different fonts, sizes, and lettering styles. If you’re new to calligraphy, a simple yet elegant cursive script can look incredibly charming and is much easier to master than elaborate calligraphic fonts. For those eager to delve into the art of beautiful lettering, this beginner’s guide to modern calligraphy offers fantastic foundational tips and techniques to help you develop your skills.
- The Lettering Process: With a steady hand and your practiced technique, carefully write each guest’s name on a dry egg. You can choose to center the name, place it slightly off-center, or even write it diagonally for a more dynamic look. Allow the ink to dry completely after writing to prevent any accidental smudging. This final step is truly “easy like Sunday morning” once you gain a little confidence, and the personalized touch it adds is absolutely priceless, making each egg a miniature work of art and a special welcome for your guests.
Creative Ways to Display Your Calligraphy Easter Eggs
Once your exquisite calligraphy eggs are complete, it’s time to showcase their beauty! Their versatility allows for numerous display options that will enhance your Easter decor and make your celebration truly memorable.
- Elegant Name Cards and Place Settings: The primary use for these eggs is as sophisticated name cards. Place one personalized egg at each guest’s setting on your Easter brunch table. This instantly elevates the individual place setting and provides a charming, personalized favor for your guests to take home as a memento of the day.
- Stunning Centerpiece: Gather a collection of your beautifully dyed and lettered eggs in a decorative bowl, a rustic basket, or a clear glass vase. Surround them with fresh spring flowers such as tulips, daffodils, or hyacinths, and complement with delicate greenery like moss or eucalyptus for a breathtaking focal point on your dining table or buffet.
- Decorative Accents Throughout Your Home: Don’t limit these beauties to just the dining table! Scatter them amongst other Easter decorations on your mantelpiece, shelves, or side tables. Their metallic sheen and delicate lettering will beautifully catch the light, adding pops of festive elegance to any room.
- An Elevated Easter Egg Hunt: For a sophisticated twist on the traditional Easter egg hunt, hide these personalized eggs for an adult-friendly scavenger hunt. Guests can search for the egg bearing their name, perhaps containing a small, special treat or clue inside, making the activity more engaging and personal.
- Charming Gift Toppers: Attach a calligraphy egg to an Easter gift bag, a wrapped present, or a bottle of wine. This handmade embellishment adds an extra layer of thoughtfulness and makes any gift feel more special and unique.
Explore More Easter Egg Designs You’ll Love and Can Create
If you’re inspired by the creative process of decorating Easter eggs and eager to try your hand at other artistic techniques, we have a wonderful array of tutorials to spark your imagination. Each method offers a distinct aesthetic, allowing you to curate a diverse and visually stunning collection for all your Easter celebrations, year after year.
- Mosaic Eggs: Unleash your inner artist by transforming broken eggshells into intricate and captivating mosaic patterns. This technique creates a textured, artisanal look that is truly unique and surprisingly achievable.
- Gold Leaf Eggs: For an unparalleled touch of opulence and shimmer, experiment with delicate gold leaf. Applying gold leaf creates a luxurious, sophisticated finish that catches the light beautifully, perfect for a high-end decorative statement.
- DIY Ombre Eggs: Master the art of gradient color with our ombre egg tutorial. This technique creates a smooth, mesmerizing transition from one shade to another, resulting in a modern, chic, and incredibly visually appealing egg design.
- Watercolor Eggs: Embrace a soft, ethereal, and artistic vibe with watercolor techniques. These eggs feature delicate, painterly designs that evoke the beauty of spring and are surprisingly easy to create, even for beginners.
Final Thoughts and Invitation to Connect
Creating these calligraphy Easter eggs is more than just a simple craft project; it’s an opportunity to infuse your holiday celebrations with deeply personal touches and heartfelt charm. Whether you’re a seasoned crafter with a knack for intricate designs or a beginner looking for an easy yet impactful DIY, the simplicity and elegance of this project make it incredibly rewarding. Your guests will undoubtedly appreciate the thoughtful detail and the effort you’ve put into making their Easter experience unique, and you’ll love the sophisticated ambiance these personalized eggs bring to your table.
Here at Sugar and Charm, our passion lies in inspiring you to discover creative, fun, and beautiful ways to express yourself through celebrations, home decor, and the simple joys of everyday life. We absolutely adore seeing your magnificent creations, so please don’t hesitate to share your experiences with us! Let us know if you make these stunning calligraphy Easter eggs by leaving a comment below. We’d be thrilled to hear about your chosen color schemes, your preferred lettering styles, and how you proudly displayed your personalized masterpieces.
To ensure you never miss out on our latest inspiring ideas, delightful tutorials, and charming updates delivered straight to your inbox, be sure to sign up for our newsletter today. Join our vibrant community and keep the creativity flowing all year long!